PRESSED EYESHADOW STUDIO
This session is manufacturing. You are producing a finished product. Three pressed eyeshadow pans and assembled into a magnetic palette.
Palette Planning
1
Define your three shades before you press anything. Color direction, finish type, and placement in a look.
BLEND & PRESS
2
Blend each pigment base with its mica. Press into pans.
QUALITY CONTROL & ASSEMBLY
3
Evaluate each pan against defined standards — surface consistency, color payoff, absence of cracking. Assemble the palette. Identify what you would change in a second batch.
BEFORE YOU BEGIN
01 SAFETY
Eyes AREA
These pigments are formulated for eye area use. All colorants are cosmetic-grade and approved for periorbital application. Do not apply to broken or irritated skin.
INHALATION
Avoid inhaling loose pigment powder when opening base bags or pouring. Keep your face away from open containers. Work in a ventilated space.
PRESSURE TOOL
Apply firm, controlled pressure when pressing. Do not use excessive force.
Pigment Staining
Iron oxides and mica pigments will stain fabric, skin, and hard surfaces. Work on a clean surface with paper towels available. Pigment on skin washes off — pigment on clothing may not.
QUESTIONS
If anything is unclear — an ingredient, a step, a result — ask before proceeding.
HYGIENE
Work on a clean, dry surface. Wash hands before handling mica. Keep base bags sealed until you are ready to use them. Have a waste area designated before you open anything.
YOUR KIT CONTENTS
1. Eyeshadow pans (3)
2. Eyeshadow base (small zip bag, pre-measured 0.8g) or (large zip bag, 2.4g)
3. Mica color tubes (3)
4. Empty palette (1)
5. C-clamp pressing tool (1)
6. Clear circular press pad (1)
7. Mixing cups (3)
8. Spatula stir sticks (3)
9. Eyeshadow applicators (3)
10. Tissue squares (3)
11. Alcohol pads
12. Safety glasses
13. Gloves
14. Apron
15. Hair net
16. Face mask
The Science
What is in your pigment base bags
Each bag contains a pre-blended combination of iron oxide pigments and a pressing binder system. The iron oxides provide the color. The binder system — a blend of magnesium myristate and magnesium stearate — is what makes pressing chemically possible.
Iron oxides are inorganic mineral compounds — the three used in cosmetics are red (CI 77491), yellow (CI 77492), and black (CI 77499). These three oxides, combined in varying ratios, produce the entire spectrum of browns, taupes, tans, bronzes, and neutrals used in cosmetic formulation. They are stable, highly pigmented, non-reactive, and approved for eye area use. The pre-blended bases in your kit combine these oxides at specific ratios to produce the four shades in your palette.
What the binder system does
The pressing binder system in your base is a blend of magnesium myristate and zinc stearate. Both are metal soaps — metal salts of fatty acids — but they perform slightly different functions in the formula.
Magnesium myristate is the primary binder. It has a finer particle size than zinc stearate, which allows it to coat pigment particles more completely and produce a smoother, silkier pressed surface with better skin adhesion. It flows readily under pressure, filling the microscopic gaps between pigment particles and forming the binding film that holds the pressed cake together when pressure is released.
Zinc stearate is a metal soap derived from zinc and stearic acid. In pressed eyeshadow formulation it functions as a binder and slip agent, improving adhesion between pigment particles and contributing to a smooth, even press. It also enhances the texture of the finished shadow, allowing it to glide across the skin with minimal resistance.
Together the two metal soaps produce a pressed pan that is smooth, stable, pickupable on a brush, and resistant to crumbling. Without this binder system, no amount of pressure will produce a stable pressed result — pigment particles without a metal soap coating compress temporarily and spring apart when pressure is released.
What your mica adds
Your three mica colors are added to the pigment base to introduce shimmer, shift the color, or change the finish. Mica alone does not press — it requires the metal soap binders already in the base to bind.
Adding mica to an iron oxide base changes two things simultaneously: the color (mica has its own hue, often a metallic or iridescent tone) and the finish (mica platelets reflect light directionally, adding shimmer or sheen to a base that would otherwise be matte). More mica means more shimmer and a lighter, more reflective shade. Less mica means a deeper, more matte result. The ratio you choose is a formulation decision.
PLAN BEFORE YOU PRESS
Complete your palette plan — all three shade names and color directions — before opening any pigment base.
ONE PAN AT A TIME
Complete one pan fully — blend, press, evaluate — before moving to the next. Do not have multiple open bases at once. Cross-contamination between shades will alter your color results.
CONSISTENT PRESSURE
Pressing technique is the variable that determines quality. The chemistry is already in your base — the binders and the pigment are pre-blended. What you control is the pressure, the evenness of the surface, and the patience of the lift.
EVALUATE EVERY PAN
After pressing each pan, assess it before placing it in the palette. Surface evenness, color payoff on skin, and structural integrity.
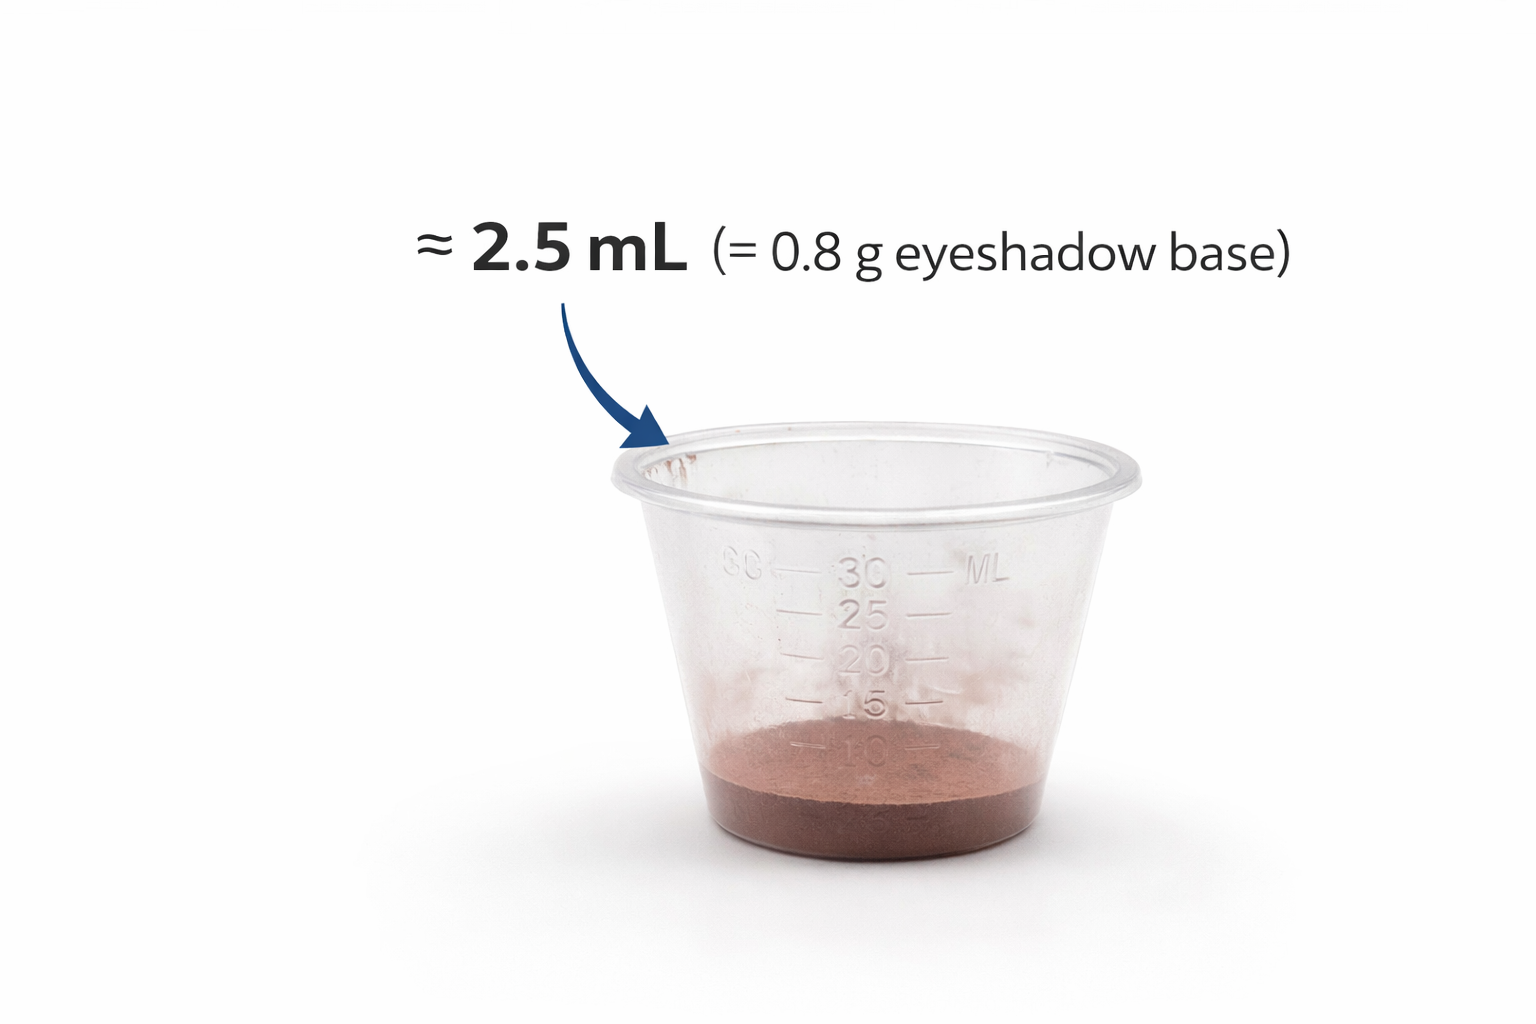
If you’re working with bulk base, this is
what 0.8g looks like in your mix cup.
02 mAKE YOUR EYESHADOWS
Iron Oxide Color Science · Dry Press Chemistry · Studio Manufacturing
1. Set out all of your materials: 3 eyeshadow pans, eyeshadow base (in either a small or large zip bag), 3 mica color tubes, 1 pressing tool (c-clamp), 1 empty palette, 3 eyeshadow applicators, 3 mixing cups, 3 spatula stir sticks, 3 tissue squares, 1 clear circular press pad, and alcohol pads.
2. Put on your safety glasses, gloves, apron, hair net, and mask before handling any materials.
3. Wipe each mixing cup inside and out with an alcohol pad before use.
4. Standardize your base. If you have a small zip bag, it contains one pre-measured portion of base (0.8g) — this is one full eyeshadow. If you have a large zip bag containing 2.4g, measure out one third of the base into your first mixing cup. This is a good opportunity to coordinate with classmates. If you would like to work with a different base color, now is the time to trade or share portions with a classmate before opening any mica.
5. Pour one full mica color tube into the mixing cup with your base. Do not exceed one tube of mica per 0.8g of base — this ratio must be maintained regardless of how much mica you use. If you choose to use less than a full tube, reduce proportionally.
6. Using your stir stick, mix the base and mica thoroughly. Continue stirring until the mixture becomes one cohesive, fluffy, evenly colored unit with no streaks or dry patches. Periodically press the mixture against the side of the cup with your stir stick — when it begins to feel sticky and holds together, it is ready to press.
7. Using your stir stick, transfer a thin layer of mixture into one eyeshadow pan — enough to cover the bottom. Do not fill it completely.
8. Place one tissue square on top of the mixture in the pan. Place the clear press pad on top of the tissue.
9. Place the pan, tissue, and press pad into the c-clamp. Position the clamp at the center of the pan and tighten firmly — do not overtighten, as this will damage the pan.
10. Hold for 30 seconds. Then loosen the clamp and reposition it to the 12 o’clock position. Tighten and hold for 30 seconds.
11. Loosen and move to the 3 o’clock position. Tighten and hold for 30 seconds.
12. Loosen and move to the 6 o’clock position. Tighten and hold for 30 seconds.
13. Loosen and move to the 9 o’clock position. Tighten and hold for 30 seconds.
14. Remove the clamp, tissue, and press pad. The surface should appear smooth and even with no clumps or loose powder.
15. Add another layer of mixture to the pan and repeat steps 8 through 14. Continue layering and pressing until the pan is filled between half and three quarters capacity once pressed. Do not overfill.
16. If you have remaining mixture in your cup, you may transfer it into a zip bag to keep.
17. To test your eyeshadow, lightly glide an applicator across the surface — do not press down hard. Apply to the back of your hand to evaluate color and finish. The pressed result will be smooth but softer than a factory-pressed shadow, which is expected with a hand-press technique.
18. Repeat steps 4 through 17 for your remaining two eyeshadow pans. Use each pressing as an opportunity to refine your technique — adjust your layering, your mixing time, or your mica amount to improve your result with each pan.
QUESTION
With all three pans assembled, evaluate the palette as a complete product. Do the three shades work together as a set? Does the palette match the concept you defined in the planning step? What would you change in a second production run?